Guidelines for Ski-O
Hardware setup
| Function | Description Description |
|---|---|
| Controls | Touch-Free PRO (TFP) |
| Start | Touch-Free PRO Start (TFP-Start) 2 minutes before start |
| Finish | 2 Loops in the ground connected to ETS1 or ECB |
| Readout | ECU or eScan |
Checklist
Before first starter
- All controls are turned on
- Touch-Free PRO Start unit 2 minutes before start
- Clock synced in all hardware (ETS1,ECB,ECU,eScan,eLink)
- Loops laid on finish-line. Use a test emiTag to verify that the electronic finish line is placed where you want it to be placed, else move the loops accordingly. You should test the finish-line-field on the right of the ski-track, on the left of the ski-track and in the middle of the ski-track
After the event
- All controls are turned off
Controls
Controls of type Touch-Free PRO (TFP) should be used during events
Turn on the controls
Controls must be switched on before the event by pressing the on/off switch for some seconds.
When the TFP is switched on, the led-diod on the control blinks fast for a couple of seconds
TFP controls are active for 36 hours after being activated and are automatically turned off after that time. It's possible to extend the active time for a control by a short press on the on/off button. When doing this the control will blink fast for a couple of seconds and a new 36 hour period is started.
NOTE The active period of a TFP is NOT extended automatically when someone punches the control. It's 36 hours from being switched on independently of punches
Punching range
Punching range with a TFP when standing still is 75cm, the range is reduced when punching in high speed.
Placing of controls
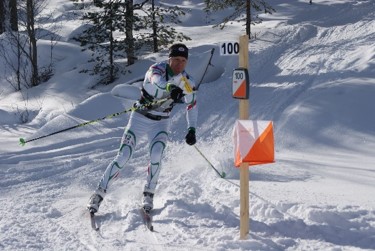
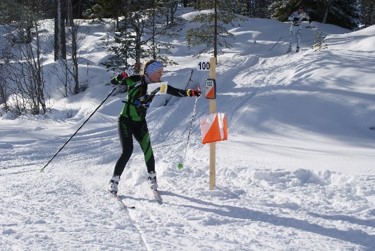
- TFP controls shall be placed clearly visible for the runner.
- The TFP must be fastened on a stick with screws. See example on picture

- The control unit should be 1-1.5 m above the ski track.
- The control code should be fastened on the stick with numbers on both sides if sticks are used.
WSOC and WC: There shall always be at least 2 control units on each control with a minimum of 1.60m between the control units
- Controls must be placed on flat ground or places where the speed is not too high since that will increase the risq of missed punches due to high speed (as with all touch-free punching systems).

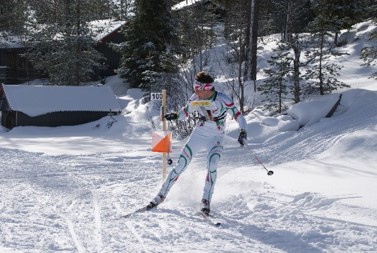
Example of bad control placement
The public control at WSOC 2011 long distance is an example of how we should not place a control.
The control was placed in the bottom of a steep downhill where the speed was 40-50 km/h. It was just before mapchange where they had to choose the right lane to their new map.
They had to reach for the control at 2 m in high speed. The bests skiers had no problem with that but some skiers failed to get a valid punch and had to turn back.
Especially short skiers had problems here.
Start
At the start a Touch-Free Start PRO unit should be used to clear the emiTag before the start.

The starting unit should be placed so that the skier clears/zeroes their emiTag 2 minutes before the actual start time. This will also act as a check that the emiTag is working.
When the emiTag is held in the field of the Touch-Free start Pro it should blink to verify that the emiTag is working. The emiTag will stop flashing if being inside the punching field to long.
Measuring the actual start time
The actual start of the race can then be conducted in different ways
Nominal start time
Let the skier start at their preallocated start time at the sound of beeps from a clock
Start gate (if 1/10th of seconds are required)
If timing requires 1/10 seconds precision, a start gate should be used to measure the exact start time of the competitior.
The start time should be measured with the same clock as the finish time. This can be done by connecting the start gate by two-wire to the start ports of the ETS1 used for the Finish Line
"Free" start time
If the runner can start when they decide themselves or that the actual start time should be measured, it's possible to use an ETS1 at start with loops in the ground measuring the exact start time of the runner. Passing that loop will also clear the emiTag once again, but a Touch-Free Start PRO should anyway be used before the start to test that the emiTag is working.
Finish
At the finish there should be loops in the ground so that you can pass the finish line at full speed.
The punching code when two loops are used is 248, and 90 when only one loop is used
Finish line loops
There should be two loops in the ground connected to an ETS1 or ECB.
Place the eLine loops as shown on the illustration:
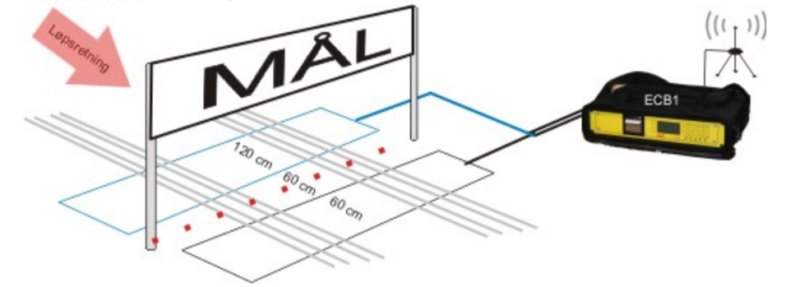
Mill off a track for the loops with a chain saw or some other suitable tool if the loops are to be placed in the snow. If the surface is asphalt or other solid ground, the loops must be taped and secured under mats suitable for the purpose.
Make sure that the loops are stable and lie safely, so that they do not disconnect and cause damage! Place the loops in the track and run the cable to the finish booth (with the ECB1). Remember that the blue loop ALWAYS must be placed in front of the finishing line and the white loop ALWAYS must be placed behind the finishing line.
The blue eLine loop has a black plug which is to be connected to the black patch cable, and then to 'LOOP 1' port on the ECB1.
The white eLine loop has a colourless plug which is to be connected to the patch cable with a white shrink tube (or with a colourless plug) and then to the 'LOOP 2' port on the ECB1.

Security zone around finish line
Note that the signals from the eLine loops may have a range of several meters You should establish a 'security zone' of about 3.5 meters to the sides of the loops and about 5 meters parallel to the race direction to avoid errors with wrongly registered competitors passing in another track.
Loop indicators on ECB and ETS1
The LED's market 'LOOP 1' and 'LOOP 2' are green when the eLine loop is connected and functioning. A red light indicates that the eLine loop is disconnected or not functioning. An orange light indicates that the eLine loop was disconnected when the power was switched on, or that the connection has been broken, but is now OK. A blue light indicates that no connected antenna is needed.
This may be the case when you wish to use the ECB1 with only one eLine loop. In such cases you connect the eLine loop to 'LOOP 1', and the 'LOOP 2' LED will be blue.

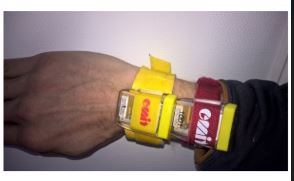
emiTag
At the competitions the skiers are using emiTag(s), strap the tag around the wrist and fasten it with safety pins.
For races broadcasted on TV,our recommendation is that each skier carries two emiTags (on the same wrist) for redundancy. Note that if skiers are assigned two emiTags, they will not recognize only one of them blinking at a control (for example when punching very fast) and you will risk having to read and merge punches from both emiTags at the finish.
Punching is performed by holding the emiTag 0-50 cm from the control for a short moment. The LED light in the emiTag will start flashing, and keeps flashing for 5 seconds after the punch.
NOTE! It is important to see this flashing, since this is the only feedback telling you that the punch is performed correctly!
When allowing the use of personal emiTags on WRE races, there should always be a possibilty to test the emiTag before starting. emiTags with a number lower than 4 121 510 must be replaced before winterseason 2024/25. For more information New emiTag | Emit
Readout
The readout is normally performed with an ECU or eScan connected to the timekeeping system for time, splittimes and punch verification

Note that readout equipment that is close to each other should operate with different codes. You can use codes 250,251,252 and 253 for reading out the chip.
If there are some errors with the punching. Raw data/splits from the emiTag can be printed with an eScan or MTR5
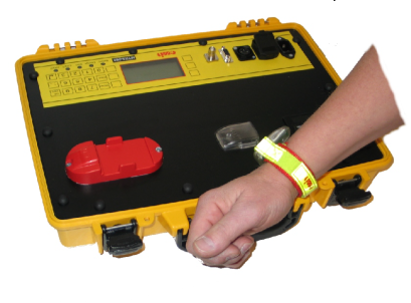
If the timekeeping system does not deliver splittimes an eScan or MTR5 can be used to give competitors splittimes immediately after the competition.